Acinetobacter baylyi ADP1 Golden Transformation
Overview
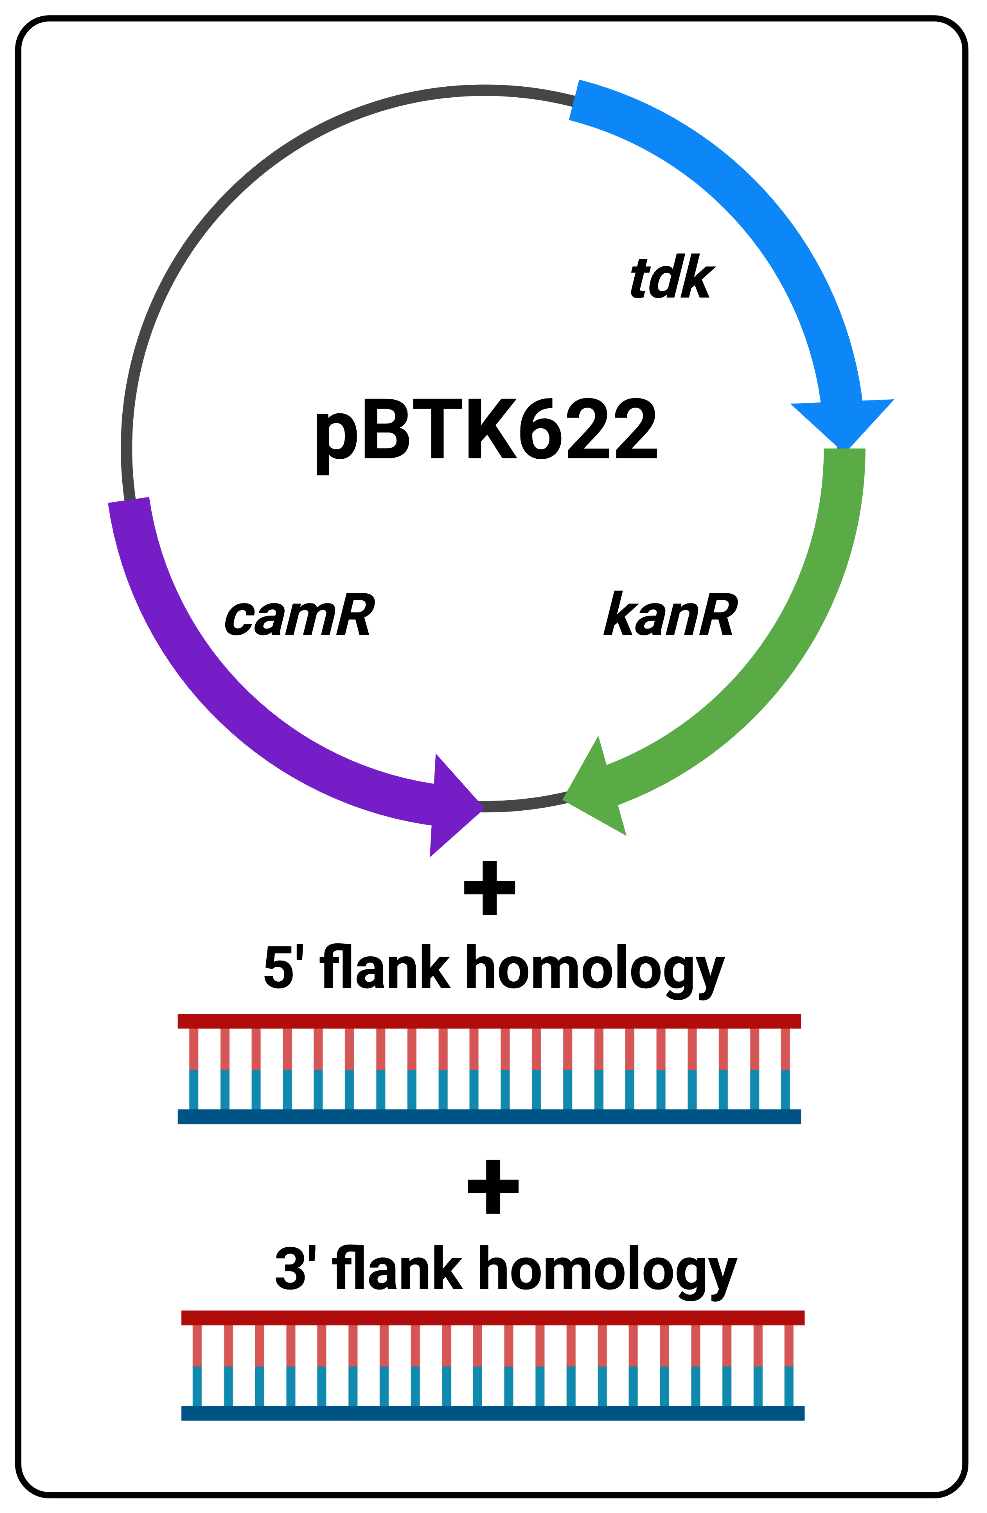
The following protocol is to be used as a substitute for overlap extension PCR for constructing double-stranded DNA fragments that template sequence replacements and/or deletions in the ADP1 genome. Addition of the flanking sequence homology needed for efficient transformation is based on Golden Gate Assembly and is much simpler and less time consuming to perform. Fundamentally, Golden Gate Assembly/cloning involves the use of plasmids which contain defined parts, called “part plasmids”, that when cut with BsaI enzymes and re-ligated (using the Golden Gate Reaction reagents and thermocycler protocol), allow the assembly of multiple parts in the desired order into a new plasmid. All of this is achieved in a single reaction tube, and then the unpurified reaction mix can be used to transform competent cells. Here we use a two-step protocol to edit the ADP1 genome. In the first step we use Golden Gate assembly to add flanking homology to the positive/negitive selection cassette (tdk/kan) we routinely use for ADP1 transformations and insert it into the genome. This reaction requires only three DNA parts:A- pBTK622 plasmid with tdk/kan cassette and camR resistance gene
B- Purified PCR product of 5’-flank homology (~1kb)
C- Purified PCR product of 3’-flank homology (~1kb)
Figure 1 The three reaction components
- Topics:
Step 1: Synthesis of homology flanks by PCR
Primer design
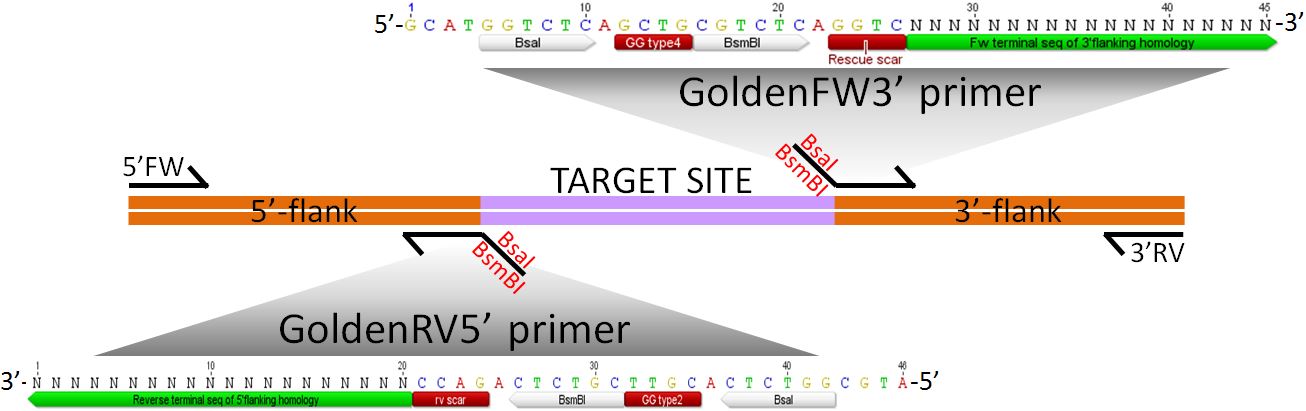
The tdk/kan cassette in the pBTK622 plasmid has BsaI sites at both ends of its sequence such that when cut by a BsaI enzyme – which cuts outside its recognition sequence - will leave the standard 4bp Golden Gate type2/type4 sticky ends. In this procedure, a BsaI site is added to each flanking homology which is designed to provide the complementary type2 and type4 sticky ends, thereby allowing the correct assembly of the three parts as follows:Figure 2 Transformation cassette for the insertion of the tdk/kan cassette (red) by ligating homologous flanking regions (orange) to it.

N = ~20bp Reverse complement terminal sequence of 5'flanking homology Primer Set 2: GoldenFW3’ [5'-GCATGGTCTCAGCTGCGTCTCAGGTC (N)20 -3’] + 3’Rv
N = ~20bp Fw terminal sequence of 3'flanking homology Each set contains one “Golden Primer” (GoldenFW3’ or GoldenRV5’) which contains ~20bp (denoted as a sequence of Ns) overlapping/targeting the flank to be amplified, plus BsaI and BsmBI sites. BsmBI sites will be used for construction of “rescue” cassette used to remove tdk/kan at the final stage of this protocol. See Figure 3 below for details.
Figure 3 Annealing of primers for amplification of homologous flanking regions by PCR. Restriction sites, which do not bind to template DNA, added to the end of each primer are shown in detail.
2. Run a gel electrophoresis to verify that the correct PCR product size was amplified.
3. Purify the PCR products using PCR purification columns and measure the DNA concentrations.
Step 2: Golden Ligation Reaction and Transformation for tdk/kan cassette insertion
Reaction conditions
In a PCR tube, setup the BsaI Golden Ligation Reaction with the following: - Reaction components -2 μL of 10X T4 DNA ligase buffer (NEB: M0202S)
1 μL BsaI-HFv2 (NEB: R3733S)
1 μL of T4 DNA ligase (NEB: M0202S)
250 ng pBTK622 plasmid
150 ng 5’flank homology (for ~1000bp) *
150 ng 3’flank homology (for ~1000bp) *
dH2O to 20µL rxn total volume *Depending on the length of each flank homology, fragment (flanks) to plasmid ratio can be adjusted to achieve the optimal 1:1:1 for each part, considering that the tdk/kan cassette is only 1.7kb and about half the size of the pBTK622 plasmid (3.3kb). Use a DNA copy number calculator, DNA mole conversion calculator, or the Promega ug to pmol calculator to balance out quantities. Run thermocycler with the following settings:
1) 37°C, 5:00
2) 16°C, 5:00
3) Goto 1, 30X
4) 55°C, 5:00
5) 80°C, 5:00
6) 12°C, ∞ Transformation steps:
1. Prepare two tubes with 500 µL LB media + 35 µL overnight culture. Label one “-DNA control” and the other “+DNA”.
2. Add all 20 µL of the Golden Gate rxn to the tube labeled “+DNA”.
3. Incubate six hours to overnight at 30C, 200 rpm.
4. Dilute each transformation 100x in sterile saline.
5. Plate 50 µL of the diluted transformation mix onto an LB-Kan plate and incubate overnight. Also plate 50 µL of the “-DNA” negative control on another LB-Kan plate (Click here for cell count and dilution basics).
6. Select 2-3 colonies to grow in liquid LB-Kan and proceed to confirm deletion/replacement in each by PCR.
Step 3: tdk/kan cassette “rescue” (Genomic deletion or insertion and removal of tdk/kan marker with minimal 4bp scar)
Deletion primer design
For deletion of the targeted region the primers and flanking regions from Step 1, above, can be used. Digestion with BsmBI allows them to be ligated together without the tdk/kan cassette, creating a substrate for rescue of the cassette with the removal of the region between the flanks.Deletion reaction conditions
1. Ligate 3’-flank to 5’-flank (using same PCR products step#3 above) by BsmBI Golden Gate assembly.- Reaction components -
2 μL of 10X T4 DNA ligase buffer (NEB: M0202S)
1 μL BsmBI (NEB: R0580S)
1 μL of T4 DNA ligase (NEB: M0202S)
100 ng 5’flank homology
100 ng 3’flank homology
dH2O to 20µL rxn total volume Run thermocycler with the following settings:
1) 37°C, 5:00
2) 16°C, 5:00
3) Goto 1, 30X
4) 55°C, 5:00
5) 80°C, 5:00
6) 12°C, ∞ 2. Repeat transformation steps above, but this time plate on LB-AZT (include a 100X dilution of the +DNA transformation and -DNA control to make sure you can pick out single colony isolates, and because AZT in the -DNA plate can be overcome by high numbers of cells.)*. Once colonies are visible, select 3-5 to grow in liquid LB and confirm tdk/kan removal by PCR using the 5'-flank FW primer with the 3'-flank RV primer (e.g., a positive result will produce an approximately 2kb band). Successful confirmation can be additionally supported by confirming their lack of growth on LB-kan, see Quick 3hr Antibiotic Rescue Verification. *If you are unable to verify your target deletion, you will want to run through the following troubleshooting steps:
1. Verify that you are plating an adequate dilution of your overnight culture e.g. 100x. If you have a high concentration of cells e.g. >10^10 and if your mutation rate is high, plating 50 uL of overnight culture directly onto LB-AZT can result in a lawn.
2. Check that you are using the correct AZT working concentration (200 ug/mL). That is, 0.1 g of AZT per 500 mL of agar.
3. Regrow your overnight culture in LB-Kan to ensure the removal of possible contaminants.
Insertion primer design
For insertion of a PCR product into the genome by rescuing an inserted tdk/kan cassette the desired PCR product should be amplified with primers creating BsaI overhangs complimentary to the primers from Step 1 using Primer Set 3, below. The insert DNA can then be joined to the homology flanks by digestion with BsaI and ligation (Figure 4) or with multiple insert pieces ligated together (Figure 5). Primer Set 3Forward [5'-ATGCGGTCTCAAACG (N)20 -3’]
N = ~20bp Sequence of the beginning of the desired PCR product
Reverse [5'-GCATGGTCTCACAGC (N)20 -3’]
N = ~20bp Reverse complement of the end of the desired PCR product
Figure 4 Transformation cassette for insertion of target DNA (green) by rescue of the tdk/kan cassette.

Figure 5 Example transformation cassette for insertion of a multipart construct by rescue of the tdk/kan cassette. In this example a construct consisting of a new promoter (blue) attached to a coding region (green) will be inserted into the genome.

Insertion reaction conditions
As "Deletion reaction conditions" above, except using this reaction mix: - Reaction components -2 μL of 10X T4 DNA ligase buffer (NEB: M0202S)
1 μL BsaI-HFv2 (NEB: R3733S)
1 μL of T4 DNA ligase (NEB: M0202S)
100 ng 5’flank homology
100 ng 3’flank homology
x ng insert DNA dH2O to 20µL rxn total volume The amount of insert DNA should be calculated relative to the homology flanks using one of the calculators in Step 1 Reaction Conditions, above.
tdk/kan cassette “rescue” with allele replacement (removal of tdk/kan to introduce mutations)
If the aim is to introduce point mutations or you want to introduce genes, promoters or other genetic elements into ADP1's chromosome, first perform the tdk-kan replacement step and then generate the desired genetic sequence with >500bp flanking homologies (ordered as a gBlock, assembled via extension PCR or PCRed from a mutant variant) and use it to perform the "rescue" step described above.Special considerations
- Earlier versions of this protocol used T7 ligase (M0318S) instead of T4 ligase because T7 ligase does not catalyze blunt end ligation. However, according to NEB T4 ligase buffer decreases T7 ligase activity, thus T4 ligase is now preferred. Blunt end ligation by T4 ligase has not been observed to cause problems with Golden Transformation (02/12/2024).
- It is also possible to obtain a good number of transformant colonies using lower amounts of DNA than those listed here; the amount of each DNA fragment can be reduced by at least half. This is useful if you have lower quantities of any of the parts previous to the assembly or if you need to do multiple transformations with the 20 µL Golden Gate reaction product (e.g., use only 10 µL per transformation mix).
- When ligating multiple parts together with a single Golden Gate reaction, for example when combining flanking homology regions with a promoter and a coding region (Figure 5), each ligation site should use a different four base overhangs. While any set of four base overhangs should work the following have been estimated to ligate with the highest fidelity and thus make the best choices for complex, multipart ligation reactions: 5'-AGGA-3', 5'-AGAA-3', 5'-GAAA-3', 5'-GGAA-3', 5'-ATGA-3', 5'-AAGT-3', 5'-ATTC-3', 5'-CTGA-3', 5'-AAGA-3', 5'-CGGA-3', 5'-AAAT-3', 5'-GAGA-3', 5'-ACGA-3', 5'-CGAA-3', 5'-AAAA-3', 5'-GTAA-3', 5'-TCCA-3', 5'-AGAT-3', and 5'-AATA-3' (Pryor et al., 2020).
- The tdk/kan cassette in plasmid pBTK622a does not have a terminator on the end of the tdk/kan part. This can be useful for driving expression of downstream genes during knockout construction if it's inserted into an operon in the same direction.
References
* Pryor J.M., Potapov V., Kucera R.B., Bilotti K., Cantor E.J., and Lohman G.J.S. 2020. Enabling one-pot Golden Gate assemblies of unprecedented complexity using data-optimized assembly design. PLoS One 15(9), e0238592.* Suárez G.A., Dugan K.R., Renda B.A., Leonard S.P., Gangavarapu L.S., and Barrick J.E. 2020. Rapid and assured genetic engineering methods applied to Acinetobacter baylyi ADP1 genome streamlining. Nucleic Acids Research 48(8), 45854600.
Barrick Lab > ProtocolList > ProtocolsAcinetobacterGoldenTransformation