Difference: QPCR (20 vs. 21)
Revision 212020-04-09 - JuliePerreau
| |||||||||||||||
| Changed: | |||||||||||||||
| < < | Quantitative real time PCR for differential gene expression | ||||||||||||||
| > > | Quantitative PCR (qPCR) | ||||||||||||||
| Changed: | |||||||||||||||
| < < | THIS PAGE IS CURRENTLY UNDER CONSTRUCTION - APOLOGIES FOR ANYTHING THAT'S STILL A BIT MESSY! | ||||||||||||||
| > > | THIS PAGE IS CURRENTLY UNDER CONSTRUCTION - APOLOGIES FOR ANYTHING THAT'S STILL A BIT MESSY! | ||||||||||||||
| Changed: | |||||||||||||||
| < < | Quantitative real time PCR is a tool routinely used for the quantitation of target nucleic acids. This protocol outlines the steps you will need to take if you want to quantify the relative upregulation or downregulation of a specific gene product following RNAi, or some other change in the environmental condition of your sample. There are a variety of different ways to perform the analysis for quantitative real time PCR (qPCR), and these different analysis methods inform what sorts of optimizations to perform each round of qPCR. This protocol will walk you through the preparation of cDNA from your biological samples and then you will have the chance to choose your analysis method and subsequent qPCR reactions to set up. | ||||||||||||||
| > > | Quantitative PCR (qPCR) is a tool routinely used for the quantitation of target nucleic acid sequences. If it is your first time performing qPCR, we recommend reading this in-depth document before you begin. Protocols for qPCR vary substantially depending on the question being asked and the input nucleic acid used. This flowchart can help you decide which qPCR approach will work best for you. Below, we provide more specific information on quantitative reverse transcription PCR (qRT-PCR) for differential gene expression. | ||||||||||||||
| Changed: | |||||||||||||||
| < < | Read through this complete protocol the first time you perform a qPCR experiment. | ||||||||||||||
| > > | |||||||||||||||
| Changed: | |||||||||||||||
| < < | This is not an easy procedure, and you will likely have to repeat your qPCR rounds a few times until you can achieve low standard deviations between technical replicates. As with most things though, the more you practice the better you'll get! (I would also recommend reading this in-depth document to better understand the entire protocol.) | ||||||||||||||
| > > | |||||||||||||||
| Added: | |||||||||||||||
| > > | Quantitative reverse transcription PCR (qRT-PCR) for differential gene expressionThis protocol outlines the steps you will need to take if you want to quantify the relative upregulation or downregulation of a specific gene product following RNAi, or some other change in the environmental condition of your sample. This protocol will walk you through the preparation of cDNA from your biological samples and then you will have the chance to choose your analysis method and subsequent qPCR reactions to set up. Read through this complete protocol the first time you perform a qPCR experiment. | ||||||||||||||
General Materials
Protocol1. Primer DesignDesign primers to your target(s) and four reference genes. You will eventually use at least 2 of these reference genes. Reference genes:
2. RNA PreparationPrepare RNA as detailed here or here, ensuring that you include on column DNase digestion. NOTE: column digestion of DNA is not always 100% complete. If you find significant DNA contamination in your RNA samples (see later), you need to complete DNase treatment using DNase 1 and use a column to clean up the RNA from the reaction mix.3. Reverse TranscriptionUse the high capacity reverse transcription kit from ABI. Per sample:
4a. Choose your own qPCR Adventure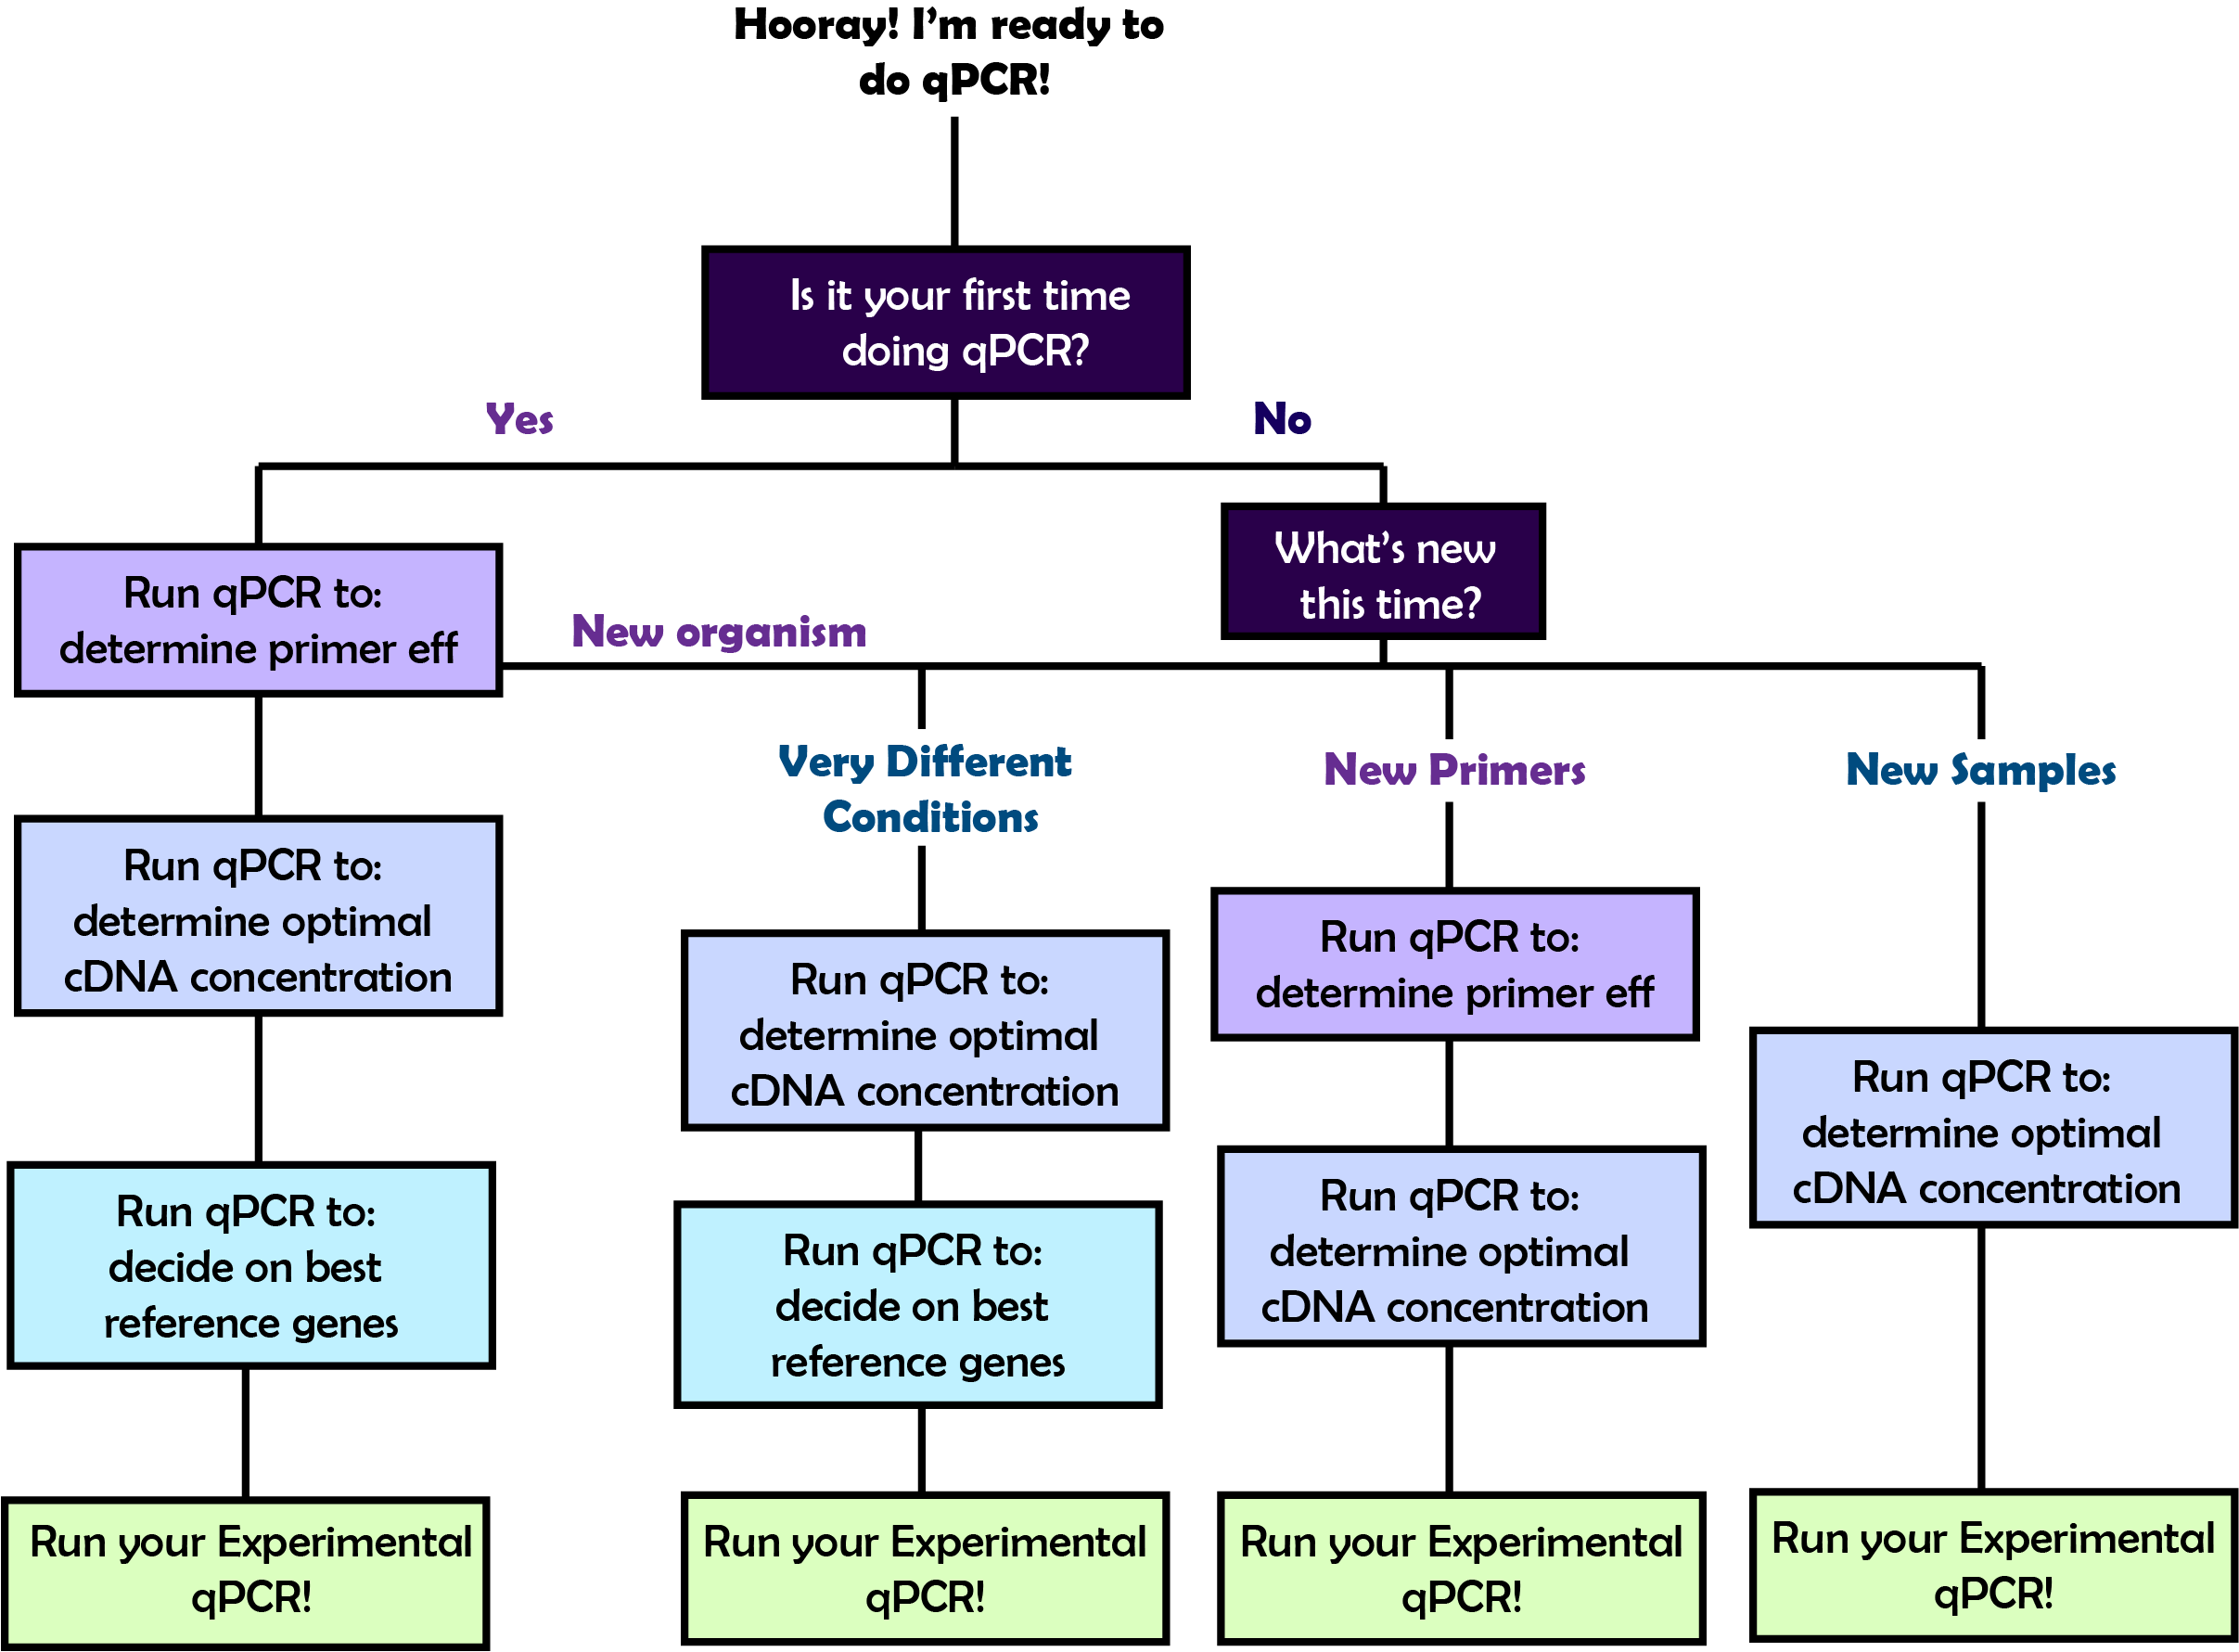 Choices before starting
In order to perform the qPCR that will answer your biological questions, you will first need to go through a few rounds of qPCR optimization. The amount of preliminary qPCR plates you will need to set up before you do your experimental qPCR will vary based on what you've done before. Refer to the flow chart on the right to figure out the path that you should take and then follow the corresponding link below to learn about the details of each step!
Choices before starting
In order to perform the qPCR that will answer your biological questions, you will first need to go through a few rounds of qPCR optimization. The amount of preliminary qPCR plates you will need to set up before you do your experimental qPCR will vary based on what you've done before. Refer to the flow chart on the right to figure out the path that you should take and then follow the corresponding link below to learn about the details of each step! | |||||||||||||||
| Deleted: | |||||||||||||||
| < < | |||||||||||||||
What step are you on?
4b. qPCR Reaction Setup | |||||||||||||||
| Changed: | |||||||||||||||
| < < | The general instructions below will guide you in setting up the 384 well reaction plate. For some experiments it may make more sense to set up a 96 well plate (the machines themselves can handle both sizes), but If you're loading quite a few samples, it is very cost and time effective to do so and it takes only a few plates worth of practice to get precise readings across technical replicates. | ||||||||||||||
| > > | You can use a 96-well reaction plate or 384-well reaction plate for qPCR. The general instructions below will guide you in setting up the 384 well reaction plate. If you're loading quite a few samples, it is very cost and time effective to do so and it takes only a few plates worth of practice to get precise readings across technical replicates. | ||||||||||||||
| Changed: | |||||||||||||||
| < < | If using a 384 well plate, load a 5ul rxn. For a 96 well, load 20ul. The following assumes a 5ul load in a 384 well plate. Scale appropriately. | ||||||||||||||
| > > | If using a 384 well plate, load a 5 μL rxn. For a 96 well, load 10 μL or 20 μL. The following assumes a 5 μL load in a 384 well plate. Scale appropriately. | ||||||||||||||
| Before you begin: | |||||||||||||||
| Changed: | |||||||||||||||
| < < | 1. Plan your plate. In an excel spreadsheet (qPCR plate template here!), plan the layout of your plate. Print it off. This is important with large plates. | ||||||||||||||
| > > | 1. Plan your plate. In an excel spreadsheet (qPCR plate template here!), plan the layout of your plate. Print it off. This is important with large plates. | ||||||||||||||
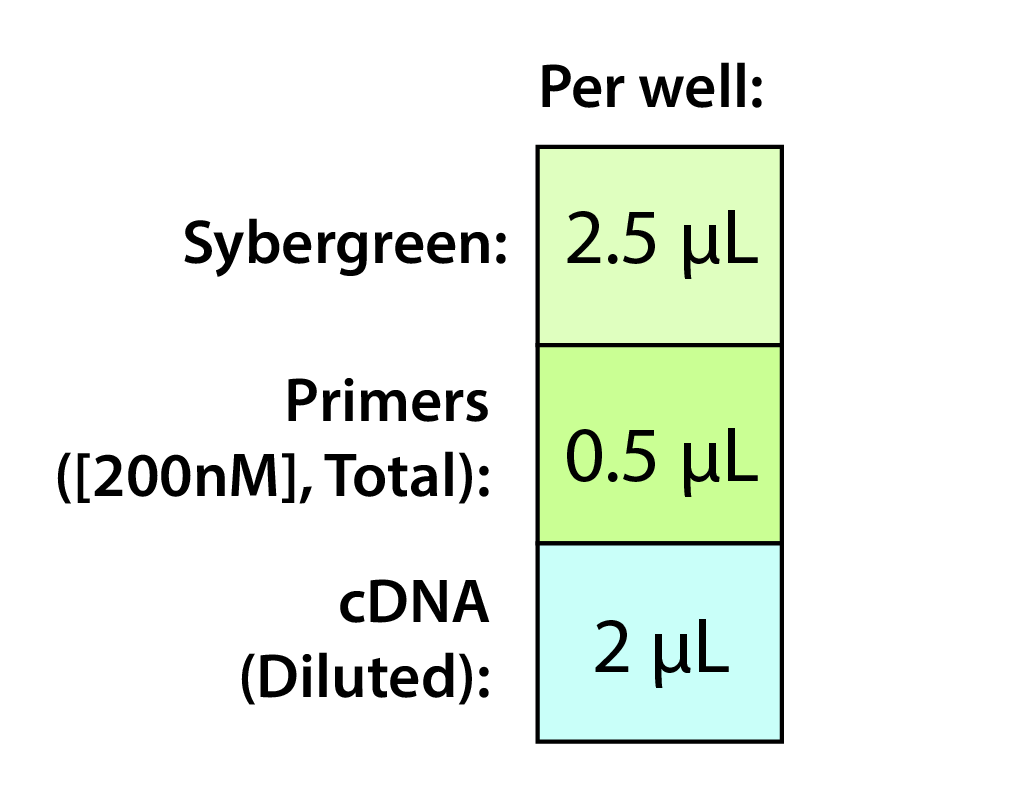
2. Calculate stock solutions of sybrgreen/primer and cDNA. Each well will be loaded with the following:
 NOTES
NOTES | |||||||||||||||
| Changed: | |||||||||||||||
| < < |
| ||||||||||||||
| > > |
| ||||||||||||||
| |||||||||||||||
| Changed: | |||||||||||||||
| < < | |||||||||||||||
| > > | |||||||||||||||
| Added: | |||||||||||||||
| > > | Basic steps for loading a qPCR plate: | ||||||||||||||
| Deleted: | |||||||||||||||
| < < | Basic Steps for Loading a qPCR plate | ||||||||||||||
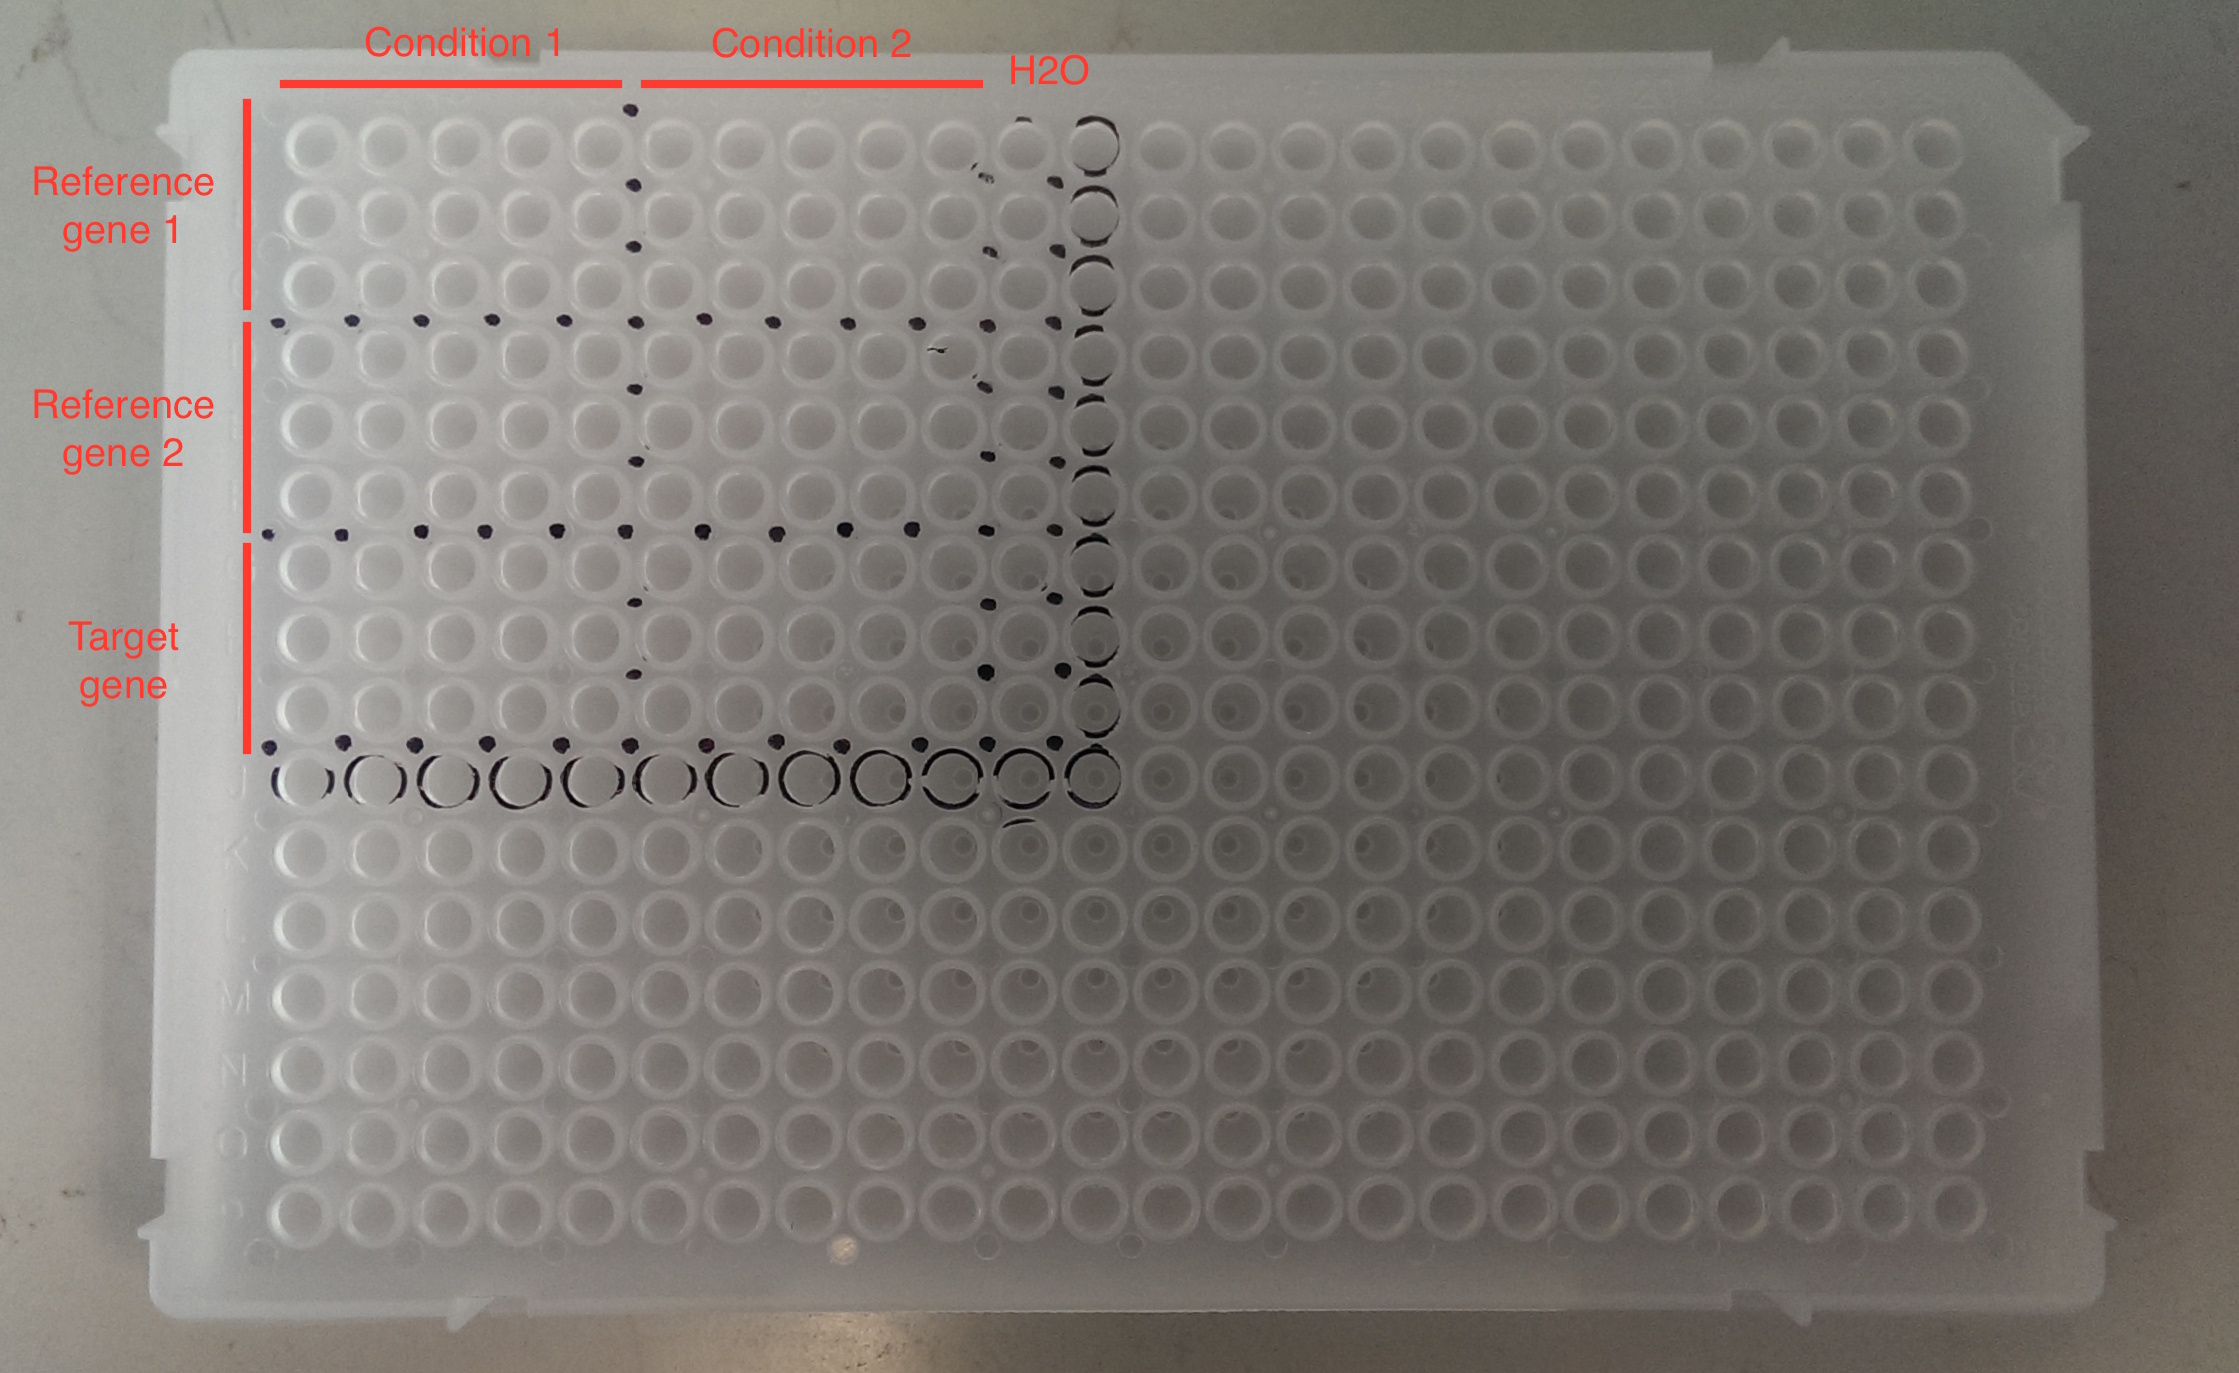
1. Mark up your qPCR plate with a Sharpie. See example below. This will help you to avoid ‘getting lost’ on your qPCR plate. Other tips: keep track of what wells you have visited by referring to your print out and by matching the tip you are taking from your tip box with the well on the plate.
 | |||||||||||||||
| Changed: | |||||||||||||||
| < < | 2. Make the stock of sybrgreen and primers, keep in dark on ice until use. 3. Make cDNA stocks, keep on ice until use. 4. Adjust your plate and get ready to load! It is useful to raise the plate so the wells can be seen more clearly: | ||||||||||||||
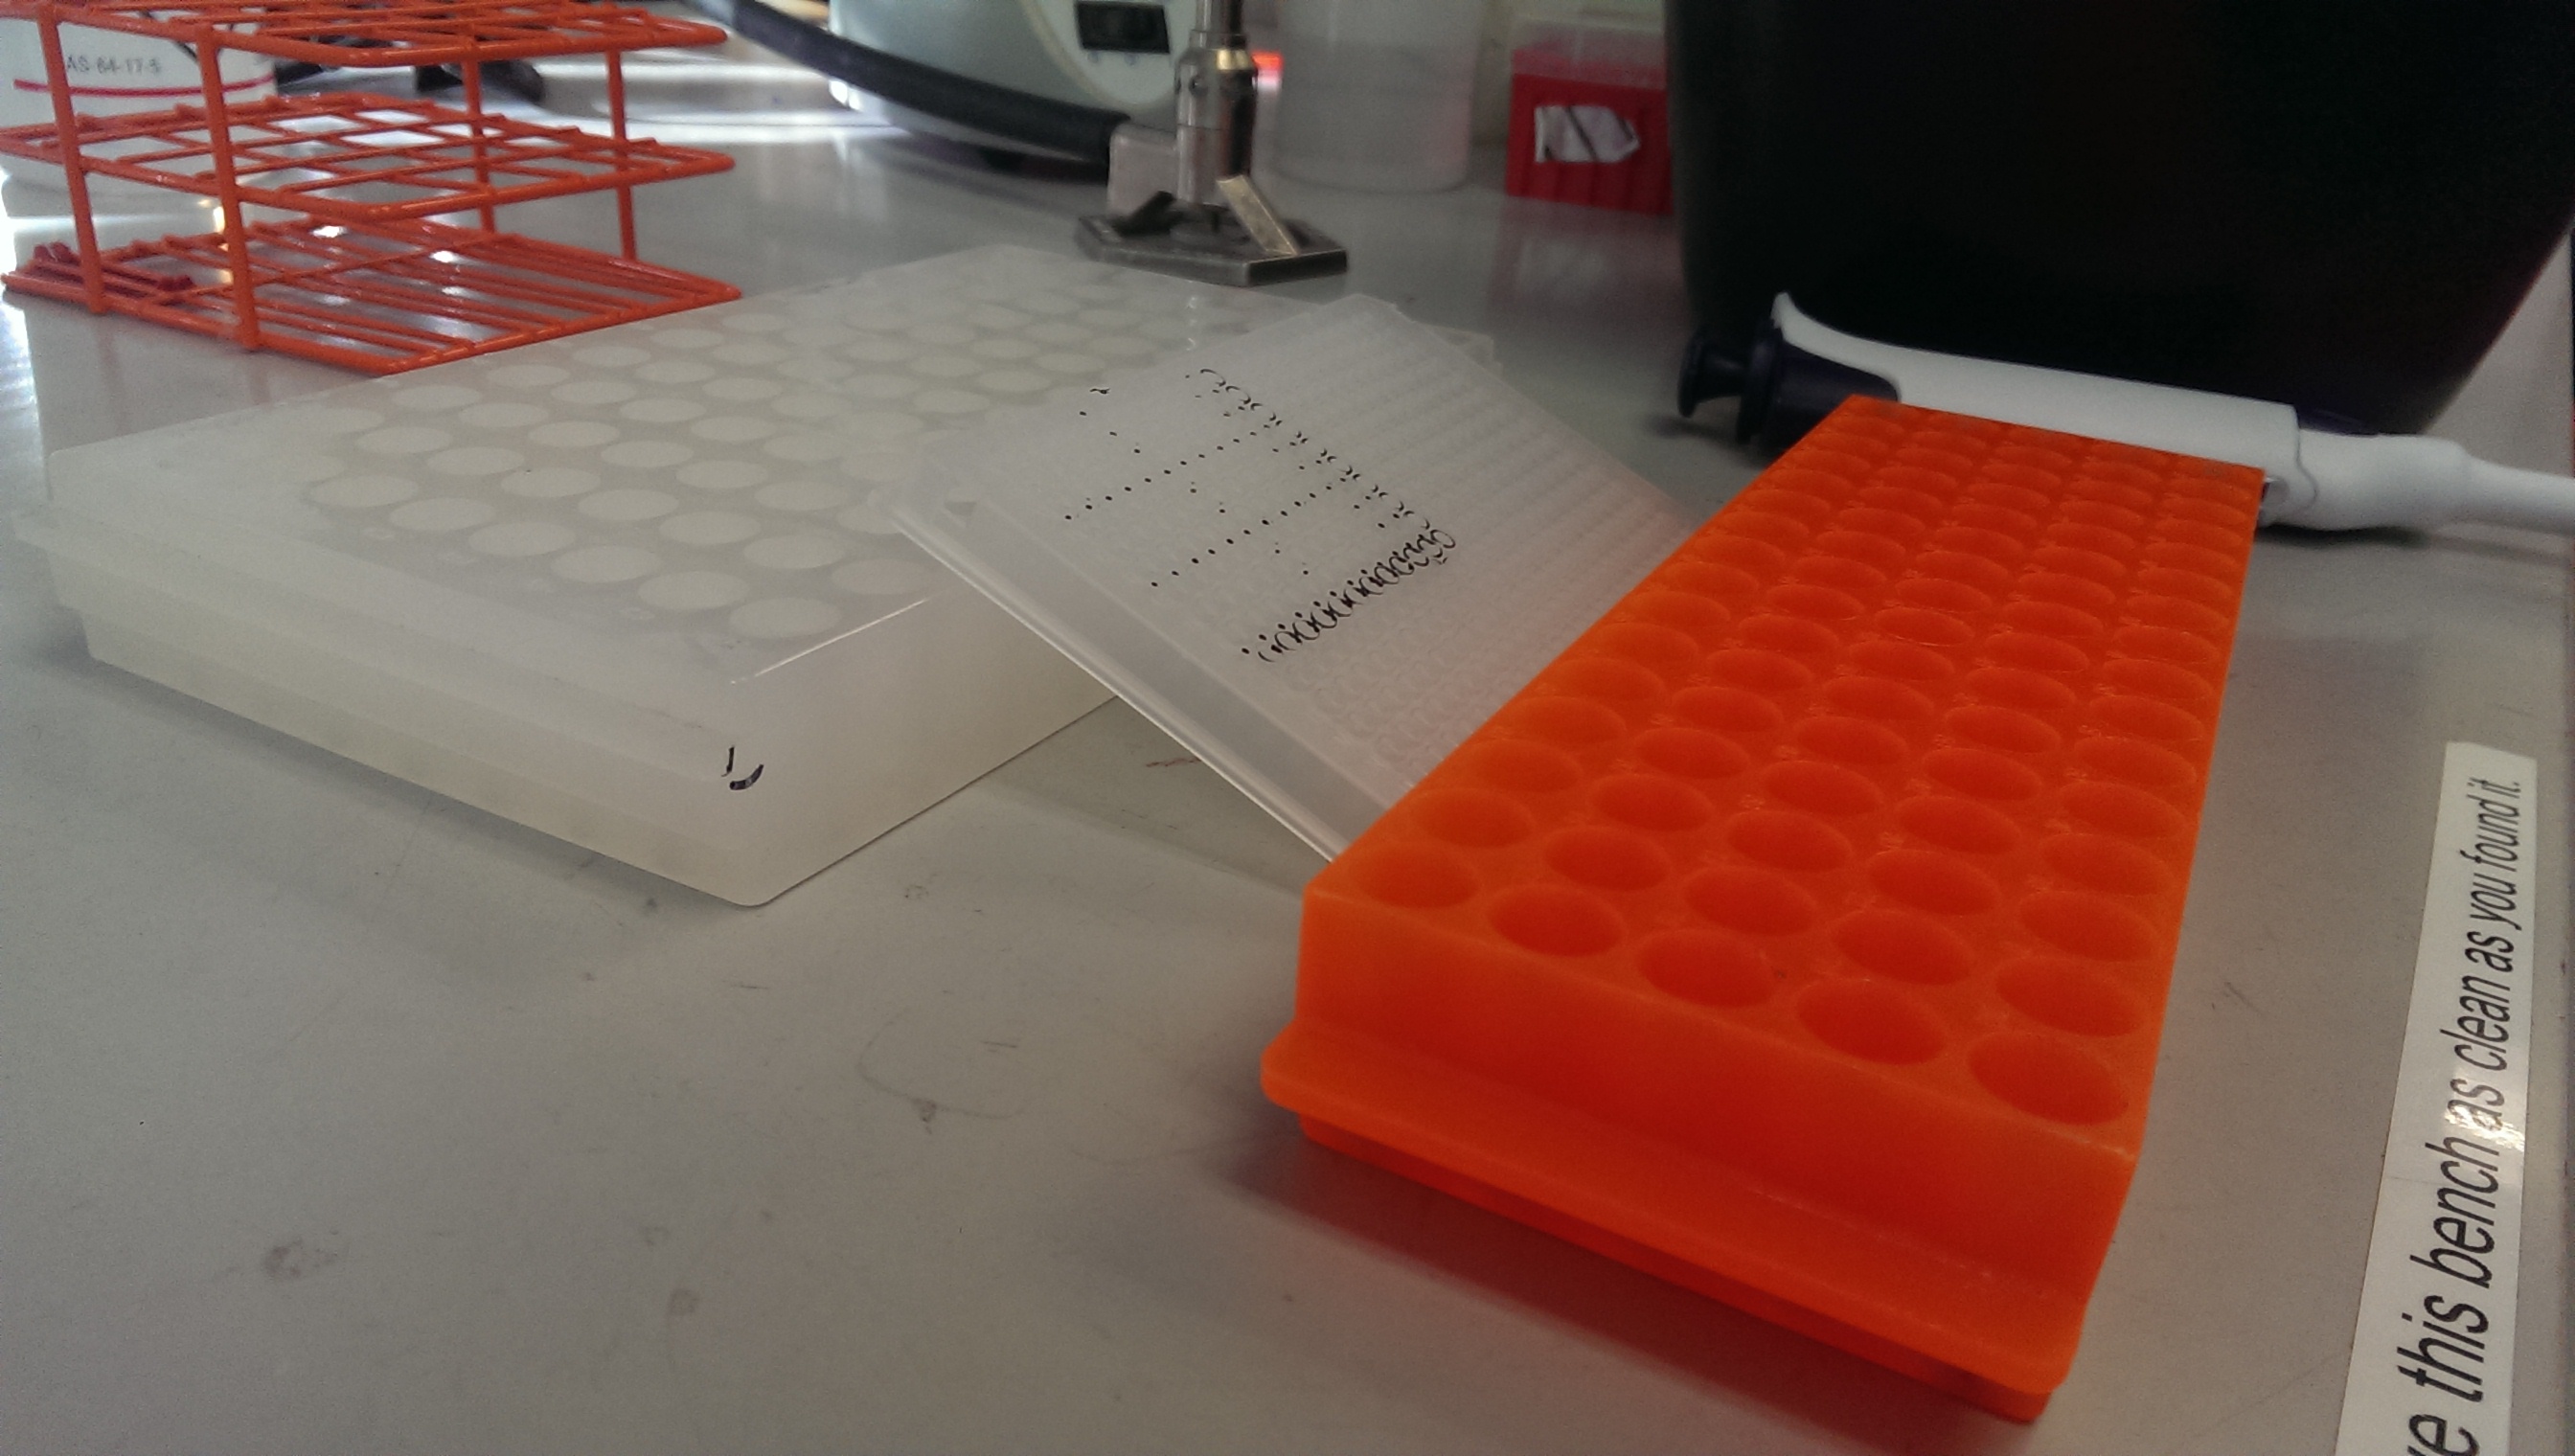
| > > | 2. Make the stock of sybrgreen and primers, keep in dark on ice until use. 3. Make cDNA stocks, keep on ice until use. 4. Adjust your plate and get ready to load! It is useful to raise the plate so the wells can be seen more clearly: | ||||||||||||||
 5. Load 3ul of sybrgreen/primer mix to each well. You do not need to change tips between wells for the same mix, only between mixes. It is important to accurately load each well:
| |||||||||||||||
| Changed: | |||||||||||||||
| < < |
7. Place an optical cover on the plate and firmly seal by running a hard, flat, clean edge over the top and around the edges of the outermost wells. 8. Peel away the serated edges of the film. 9. Spin down @ 1000rpm , 1 min. (there is a plate centrifuge in the qPCR machine room) 10. Run on qPCR machine as per instructions during training. | ||||||||||||||
| > > |
7. Place an optical cover on the plate and firmly seal by running a hard, flat, clean edge over the top and around the edges of the outermost wells. 8. Peel away the serated edges of the film. 9. Spin down at 1000 rpm for 1 minute. Note: there is a plate centrifuge in the qPCR machine room. 10. Run on qPCR machine as per instructions during training. | ||||||||||||||
| |||||||||||||||
| Added: | |||||||||||||||
| > > |
| ||||||||||||||
View topic | History: r25 < r24 < r23 < r22 | More topic actions...