Comparative Quantitative PCR (qPCR)
Quantitative PCR (qPCR) is a tool routinely used for the quantitation of target nucleic acid sequences. If it is your first time performing qPCR, we recommend reading this in-depth document before you begin. Below, we provide more specific information on quantitative reverse transcription PCR (qRT-PCR) for differential gene expression. This protocol will walk you through the preparation of cDNA from your biological samples and then outline the sequence of informative qPCRs you will need to perform to achieve your desired goal. Read through this complete protocol the first time you perform a qPCR experiment.General Materials
- Primers (see below for design)
- ABI high capacity reverse transcription kit with random primers (from LifeTech freezer in MBB supply room)
- RNase/DNase free water
- Sybrgreen 2x PCR master mix (from LifeTech freezer in MBB supply room)
- ABI 384/96 well optical plates (ThermoFisher cat#4309849/cat#N8010560)
- Thermaseal Transparent sealing films for Real-time PCR, (Excel Scientific cat#TS-RT2-100)
- Training on the ABI qPCR machines in MBB (contact the Core for information).
Protocol
1. Primer Design
Design primers to your target(s) and four reference genes. You will eventually use at least 2 of these reference genes. Reference genes:- You will need to find multiple reference genes to normalize expression to.
- These need to be stable across all the conditions (control and experimental) and this needs to be empirically determined by your own testing (see later).
- Candidate genes might come from:
- Previous publications
- Previous experience
- Microarray compendiums; variance in expression can be determined for individual genes from thousands of samples across multiple conditions (e.g. Faith et al, 2008 Nucleic Acids Research, 10.1093/nar/gkm815).
- Go to https://www.idtdna.com/PrimerQuest/Home/Index, enter your sequence and select ‘two primers, intercalating dye’.
- Click on ‘customize your assay’. Up the optimal Tm to 63 and the minimum Tm to 60.
- Increase the optimal amplicon length to 120bp.
- Click ‘get assays’ and find a primer pair that closely matches the above conditions and for which both the primer Tms are equal. Click ‘view assay details’. Hovering over the primer sequence will give you options to check secondary structure and BLAST for off target transcripts. Do this.
- Order your favorite primer pair.
2. RNA Preparation
Prepare RNA as detailed here or here, ensuring that you include on column DNase digestion. NOTE: column digestion of DNA is not always 100% complete. If you find significant DNA contamination in your RNA samples (see later), you need to complete DNase treatment using DNase 1 and use a column to clean up the RNA from the reaction mix.3. Reverse Transcription
Use the high capacity reverse transcription kit from ABI. Per sample:| RNA | 100 ng – 500 ng (x µl) |
| 10x buffer | 2 µl |
| dNTPS | 0.8 µl |
| Random primers | 2 µl |
| RTase | 1 µl |
| H2O | 14.2 µl - x µl |
- 25°C – 10 min
- 37°C – 120 min
- 85°C – 5 min
4a. Choose your own qPCR Adventure
 Choices before starting
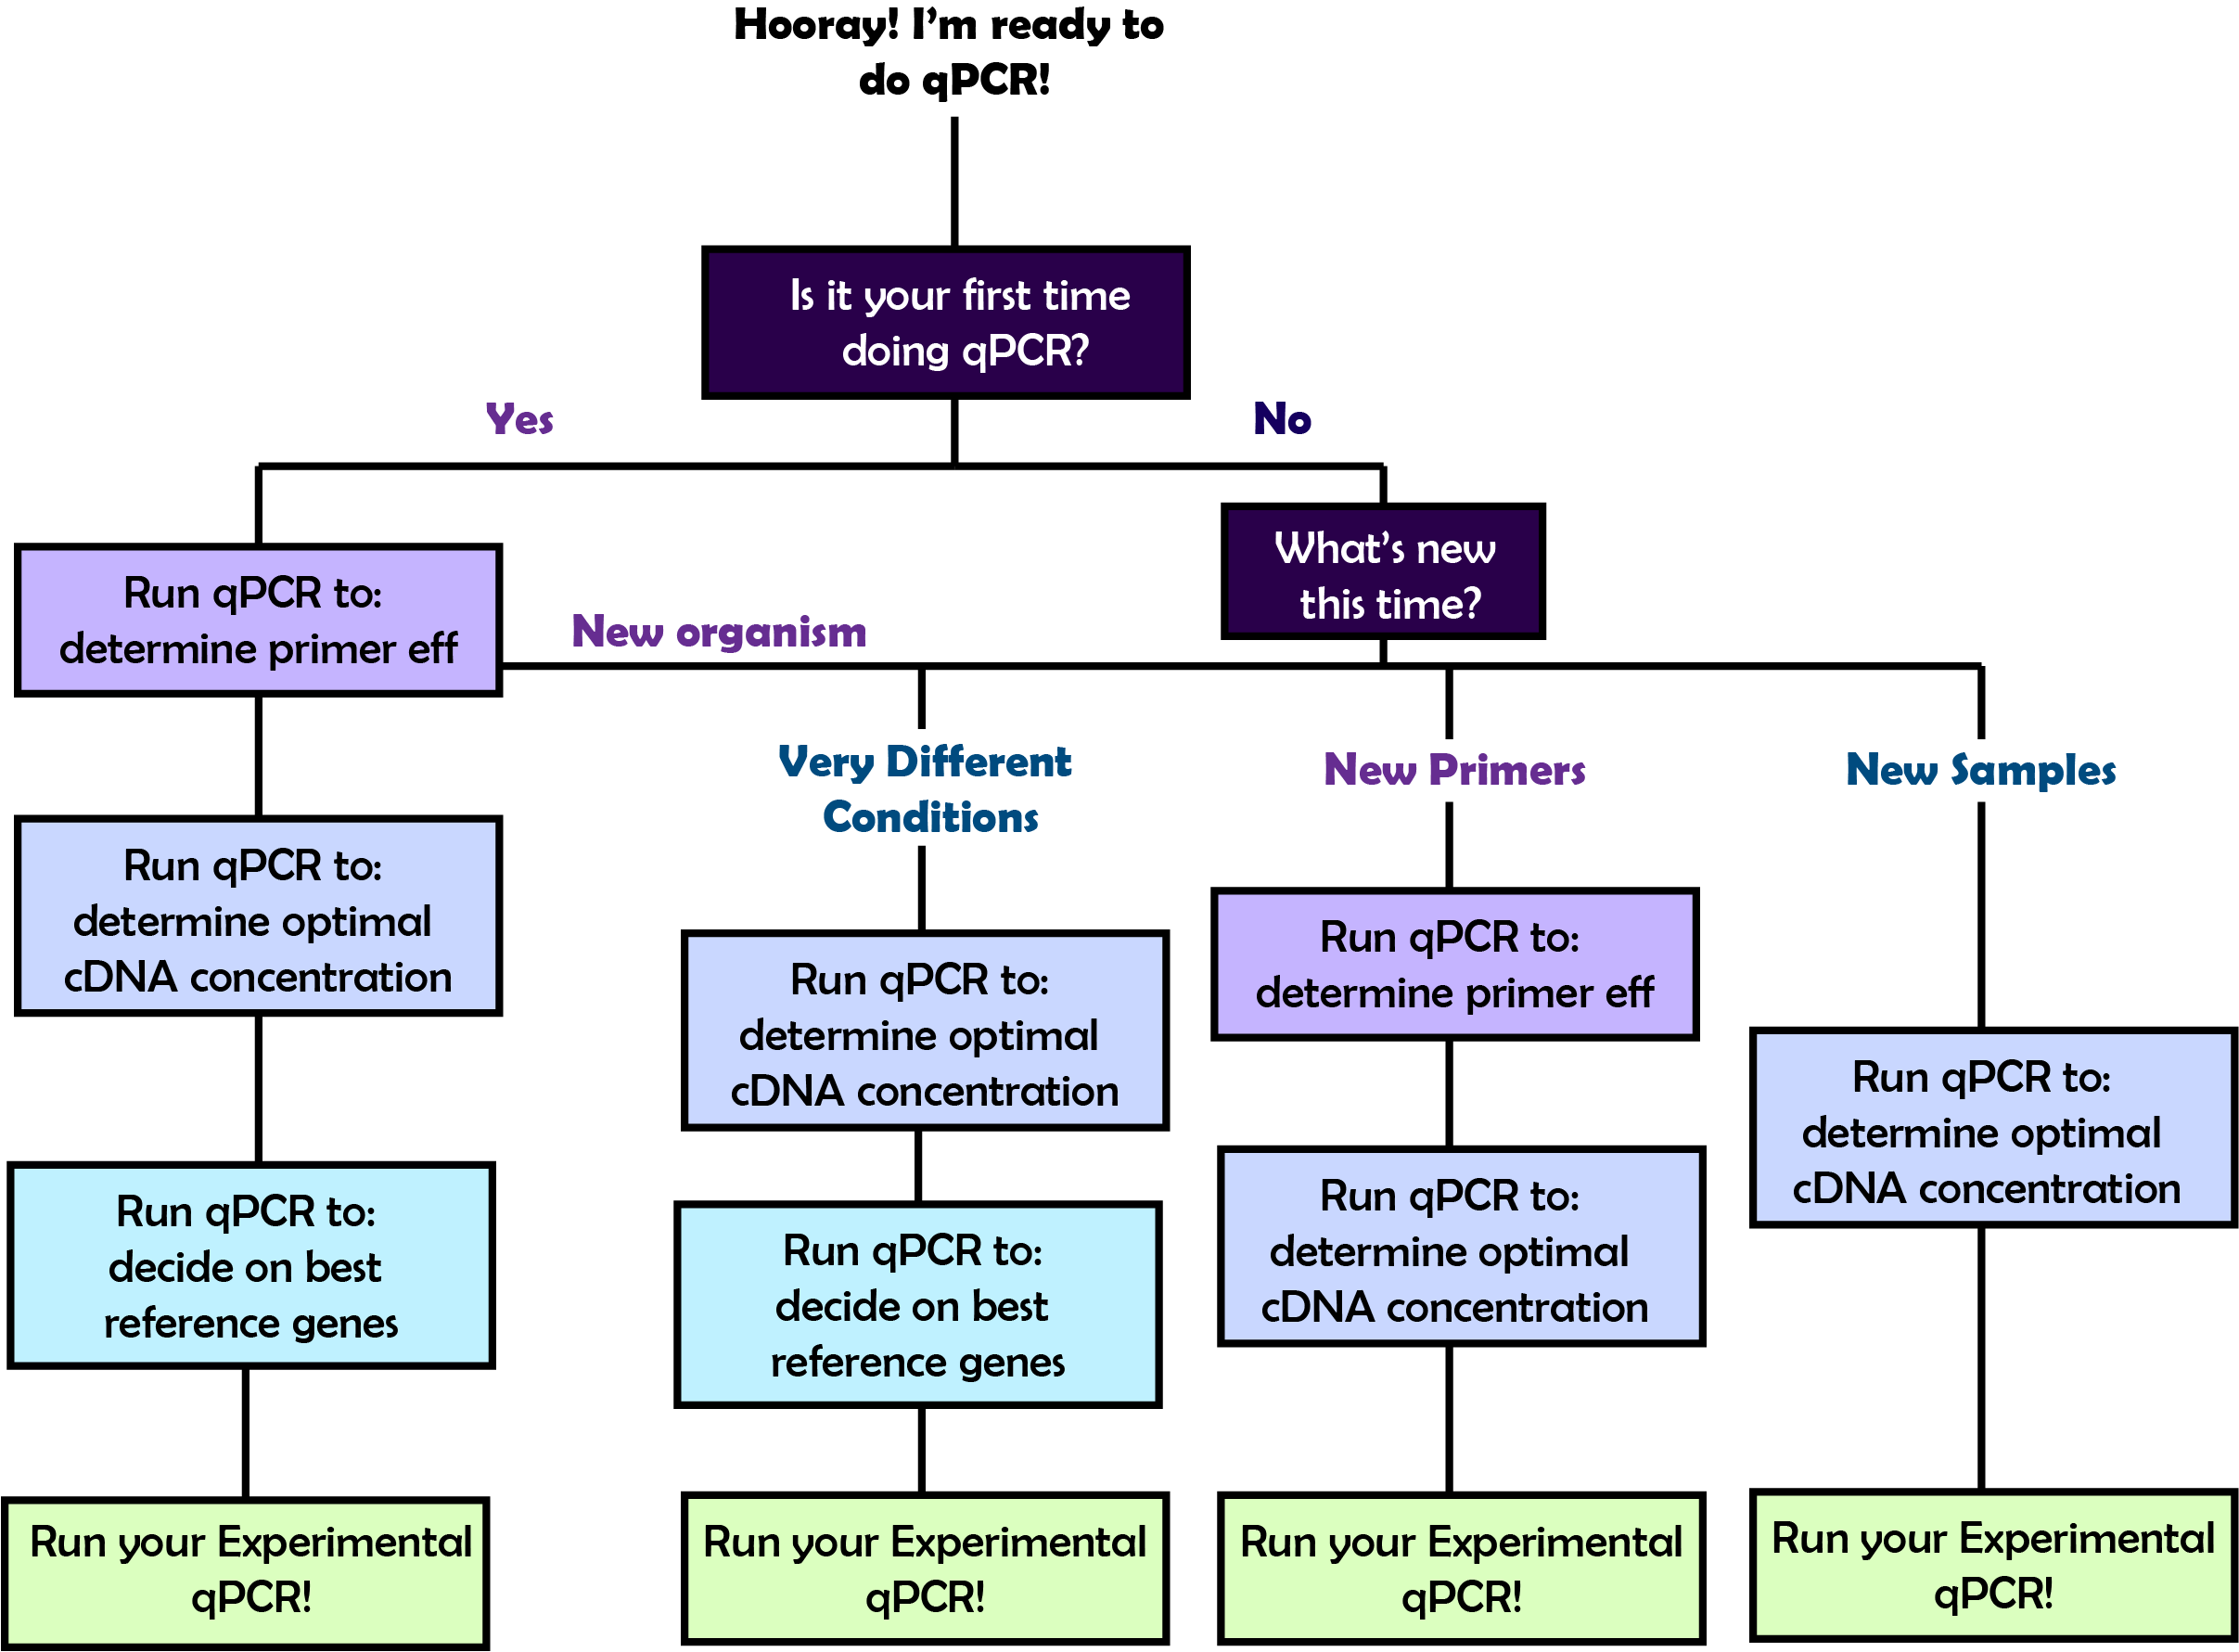
In order to perform the qPCR that will answer your biological questions, you will first need to go through a few rounds of qPCR optimization. The amount of preliminary qPCR plates you will need to set up before you do your experimental qPCR will vary based on what you've done before. Refer to the flow chart on the right to figure out the path that you should take and then follow the corresponding link below to learn about the details of each step!
What step are you on?
Choices before starting
In order to perform the qPCR that will answer your biological questions, you will first need to go through a few rounds of qPCR optimization. The amount of preliminary qPCR plates you will need to set up before you do your experimental qPCR will vary based on what you've done before. Refer to the flow chart on the right to figure out the path that you should take and then follow the corresponding link below to learn about the details of each step!
What step are you on? - Primer Efficiency qPCR -- Determine the efficiency of the primers you designed
- cDNA Concentration qPCR -- Determine the optimal concentration of cDNA to use in your qPCRs
- Reference Gene qPCR -- Determine the most consistent ref gene for your conditions
- Experimental qPCR -- Run your experiment
4b. qPCR Reaction Setup
You can use a 96-well reaction plate or 384-well reaction plate for qPCR. The general instructions below will guide you in setting up the 384 well reaction plate. If you're loading quite a few samples, it is very cost and time effective to do so and it takes only a few plates worth of practice to get precise readings across technical replicates. If using a 384 well plate, load a 5 μL rxn. For a 96 well, load 10 μL or 20 μL. The following assumes a 5 μL load in a 384 well plate. Scale appropriately. Before you begin: 1. Plan your plate. In an excel spreadsheet (qPCR plate template here!), plan the layout of your plate. Print it off. This is important with large plates. 2. Calculate stock solutions of sybrgreen/primer and cDNA. Each well will be loaded with the following: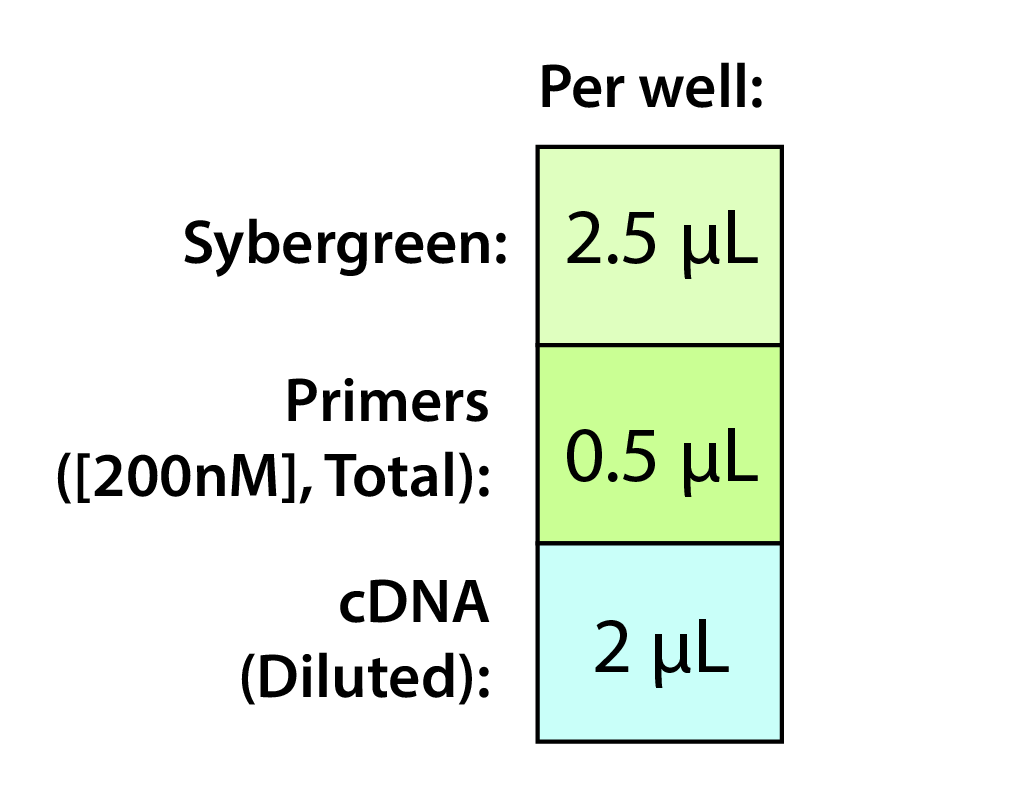 NOTES
NOTES - Both primers are included in the total volume here (i.e. 0.25 μL each).
- Recommend a 200 nM final concentration for the primers (0.5 μL of 2000 nM working stock). Try out others if desired.
- The degree of dilution for the cDNA will be determined in one of your initial qPCR runs.
Basic steps for loading a qPCR plate: 1. Mark up your qPCR plate with a Sharpie. See example below. This will help you to avoid ‘getting lost’ on your qPCR plate. Other tips: keep track of what wells you have visited by referring to your print out and by matching the tip you are taking from your tip box with the well on the plate.
 2. Make the stock of sybrgreen and primers, keep in dark on ice until use.
3. Make cDNA stocks, keep on ice until use.
4. Adjust your plate and get ready to load! It is useful to raise the plate so the wells can be seen more clearly:
 5. Load 3ul of sybrgreen/primer mix to each well. You do not need to change tips between wells for the same mix, only between mixes. It is important to accurately load each well:
 - Lower the tip to the bottom of the well
- Lightly touch the bottom
- Eject the total contents
- Keep the plunger depressed as you pull out of the well.
- Do not drag the tip up the sides of the well when pulling out.
- Use non-barrier tips! For some reason, less fluid is retained in them between wells.
7. Place an optical cover on the plate and firmly seal by running a hard, flat, clean edge over the top and around the edges of the outermost wells.
8. Peel away the serated edges of the film.
9. Spin down at 1000 rpm for 1 minute. Note: there is a plate centrifuge in the qPCR machine room.
10. Run on qPCR machine as per instructions during training.


| I | Attachment | History | Action | Size | Date | Who | Comment |
|---|---|---|---|---|---|---|---|
| |
1125331_ABI_-_Guide_Relative_Quantification_using_realtime_PCR.pdf | r1 | manage | 495.6 K | 2017-02-14 - 21:16 | SimonDAlton | |
| |
IMAG2516.jpg | r1 | manage | 666.1 K | 2017-02-09 - 21:29 | SimonDAlton | |
| |
IMAG2517.jpg | r1 | manage | 810.3 K | 2017-02-09 - 21:36 | SimonDAlton | |
| |
example_calc.jpg | r1 | manage | 79.3 K | 2017-02-09 - 22:18 | SimonDAlton | |
| |
pcr-methods-WE41324_Fig11.jpg | r1 | manage | 47.0 K | 2020-04-09 - 16:56 | JuliePerreau | |
| |
qPCR_Goal | r1 | manage | 129.8 K | 2020-04-09 - 16:56 | JuliePerreau | |
| |
qpcr_plate_setup.xlsx | r1 | manage | 13.1 K | 2019-03-21 - 15:49 | KateElston | qPCR plate template |
Barrick Lab > ProtocolList > QPCR
Contributors to this topic  KateElston, SimonDAlton, JuliePerreau, DanielDeatherage
Topic revision: r23 - 2022-03-30 - 17:56:22 - Main.KateElston

 The LTEE
 iGEM team
 NGS course